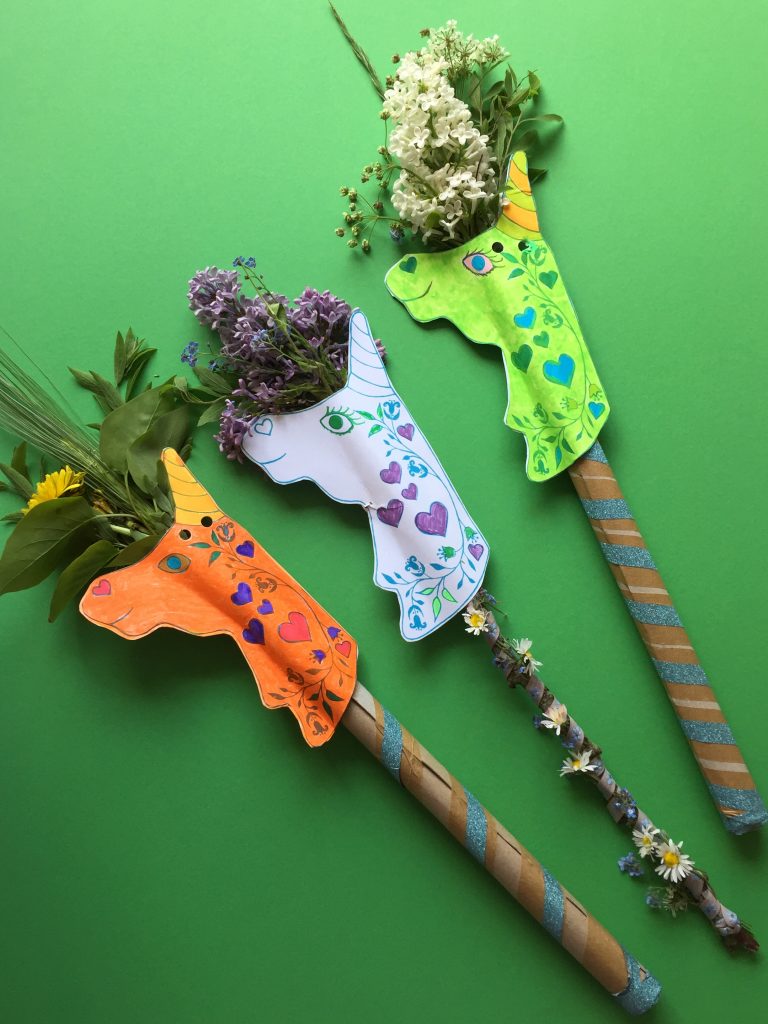
Make a magical – and recycled – wand with our new unicorn printable!
This simple cardboard & flower Unicorn Wand is an easy craft project to make with kids – for a fun afternoon of play!

Crafting these colourful and sustainable unicorn wands, from rolled up Pizza Boxes, takes only an hour or so – and provides hours of fun play! Download our new unicorn printable below to get started:
download your unicorn printable here:
Download the Unicorn Craft Printable in our shop here:
https://www.theawesomechildhoodproject.com/awesome-craft-ideas-for-kids-instant-download/instant-download-crafts-kits/recycled-card-crafts/unicorn-card-jewellery-kids-craft-set/
What you need to make a recycled cardboard & flower unicorn wand:
- pizza box or other cardboard
- Unicorn Printable (both pages) printed on card
- cello tape, paper parcel tape or washi tape etc.
- flowers or foliage (optional)
- felt tip pens or crayons (optional)

Get your flower unicorn wand printable:
Download the Unicorn Craft Printable in our shop here:
https://www.theawesomechildhoodproject.com/awesome-craft-ideas-for-kids-instant-download/instant-download-crafts-kits/recycled-card-crafts/unicorn-card-jewellery-kids-craft-set/
How to make a recycled cardboard & flower unicorn wand:

Firstly cut out the front panel of a pizza box (or use any other card – recycled or new!) and start rolling it around a stick until it becomes a narrow tube. Try to roll it tightly to get your ‘tube’ as narrow as you can.

Starting at the top – go all the way down the tube with tape – twisting it round and round. The tape will secure your tube in place, and it will add a decorative effect too.

Use another colour tape on top of your first tape – for extra decorative effect!

Download your Unicorn Printable PDF below:
Download the Unicorn Craft Printable in our shop here:
https://www.theawesomechildhoodproject.com/awesome-craft-ideas-for-kids-instant-download/instant-download-crafts-kits/recycled-card-crafts/unicorn-card-jewellery-kids-craft-set/

Cut out the two large mirror image unicorn heads, and colour them in (optional) . If you would like to use additional shapes to decorate your unicorn wand, then cut them out too.

Apply PVA glue in narrow strips to the edges of one unicorn shape – creating an open ‘channel’ through the unicorn head. Make sure to leave the top edge of the shape free from glue – as this needs to remain open to insert flowers into the wand later.
Press the two unicorn shapes together – creating a two sided card shape – and leave to dry.

When your unicorn head is dry, use a stick or pen to open up the gap through the middle of the shape, so the ‘channel’ appears (see picture above). Push your narrow card tube inside the ‘channel’ in the unicorn head.
This step can be tricky – so kids might benefit from help at this point!
Decorating your Recycled Cardboard Unicorn Wand

Collect some seasonal foliage or flowers – tape it into a mini bouquet – and insert it into the top of your unicorn wand. This step is optional but – in my opinion – it’s the best part of this craft!

And Voila! Your recycled cardboard Unicorn Wand is ready!
Now you can colour it in some more – and add sequins, pompoms, tassels, or more flowers to make it even more magical! You can also decorate it with all the other shapes from the printable!

Want make a Cardboard Art Unicorn Necklace to go with your wand?
Visit our Cardboard Art Necklace tutorial blog post HERE

Thank you for reading – I hope you have as much fun as we did with this project! Plese tag #theawesomechildhoodproject on social media – or comment below – so we can see, and share, your wonderful creations!
Ulla Lake x x


